Dynamic Hip Screw
A Dynamic Hip Screw or a DHS for short is a frequent flyer on the trauma list. One would hope to have seen and done a few prior to attending the ST3 orthopaedic recruitment interview to become an orthopaedic registrar.
It’s a simple operation, however don’t underestimate it, as at times they can be tricky!
Everything you need to know
 Theory
Before getting started with how to do it lets just recap the importance of the position of the lag screw.
- Indications
- Inter-trochanteric fractured neck of femur
- Contraindication / Caution
- Reverse oblique proximal femoral fracture
- Sub-trochanteric femoral fracture
Everything you need to do
Procedure
I would perform a dynamic hip screw in a patient with an appropriate indication who I have reviewed the pre-operative imaging, marked and consented.
Pre op
- Team brief (equipment i.e traction table, or large fragment set)
- Antibiotics as per trust protocol (IV Teicoplanin & Gentamicin)
- Image Intensifier
Positioning
- Supine on traction table
- Remove triangle from under operated buttock
- Position post between legs and bring patients perineum down to post
- Operated leg onto traction
- Non-operated leg into a lithotomy position (compression stockings, and calf compression device)
- Patient warming
- Arms strapped across chest and away from potential harm from image intensifier C-Arm
Fracture Reduction
- When reducing the fracture I personally find that placing the leg into the traction boot and securing it, then externally rotating the leg, applying traction and then internally rotating the leg (until patella is facing the ceiling) usually achieves a good reduction.
- Reduction is assessed on the:
- AP view
- Fragments reduced to acceptable position
- Length – restoration of shentons line
- Varus / valgus angle (should be around 135degrees)
- Lateral view
- Alignment of shaft, trochanters and neck
- AP view
Technical considerations
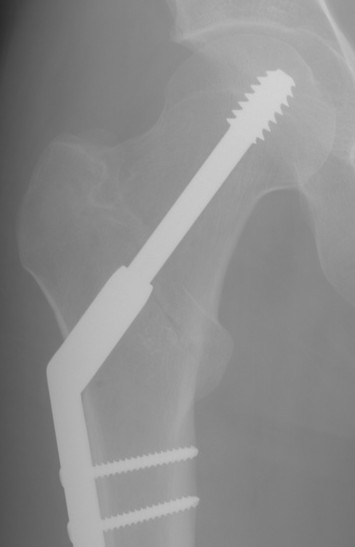
- Read and understand this paper by Baumgaertner published in the Journal of Bone and Joint Surgery America in 1995. It is a landmark paper describing the cut out (failure rate) of DHS screws in consideration to tip apex distance (which should be less than 25mm) and the position of the lag screw in the head (should be AP centre / Lateral centre).
Procedure
- Operative technique can be found here:
- Prep and drape the operated limb (Anterior Superior Iliac Crest to knee), then use clear sticky drape and place over bar and stick down
- WHO safer surgery check prior to skin incision
- Image intensifier to approximate entry point and top of incision
- Palpate femur and make incision slightly posterior to the centre of the bone cutting through, skin, then subcutaneous fat, then down onto fascia lata
- Use the swab to sweep the fat off the fascia making it easier to identify on closure
- Incise fascia, then use the scissors to split the fascia proximally and distally
- You can then either use a vastus splitting of sub vastus approach to the femur
- Take a bristo elevator to sweep the vastus off the bone
- Place norfolk and norwich retractor (handle pointing to toes so then it doesn’t interfere with you II imaging) to retract vastus lateralis
- Once down on bone take 135 degree jig and 2.5mm DHS wire mounted on power tool
- Position the jig onto the femur and take an AP image of the hip with the II machine (generally the ideal entry point tends to be at approximately the level of the lesser trochanter)
- Once happy that the wire with will project into the centre of the head on the AP view advance the wire a couple of centimeters (remember that the femoral neck is anterverted so you need to drop your hand towards the ground to aim the tip of the wire up about 15 degrees)
- Then taken a lateral view with the II to ensure that the guide wire is heading to the centre of the head on the lateral view
- Once happy with the position of the wire advance under II control until approximately 5mm away from the cortex of the femoral head in the AP and Lateral view
- Take jig off bone
- Take the measure
- Measure the length of the screw (usually around 95mm), if less than 80mm use short barrelled DHS plate
- Set triple reamer to length of the screw
- Ream under II control taking frequent radiographs to ensure that the guidewire is not advanced into the pelvis
- Remove reamer, leaving guidewire in the bone (if the wire is removed ensure that its position once reinserted is checked with II)
- Insert screw using centralising guide on screw driver, screening whilst inserting (basicervical type of fractures can sometimes displace whilst inserting the screw, therefore ensure you screen with II. If the fracture starts to displace back the screw out slightly and insert an additional wire above the screw to act as a de-rotational wire and stop the head from moving)
- Once screw is inserted ensure that handle is parallel to the femur to allow the plate to slide on
- Select length of DHS plate (usually 135 degree 4 hole plate) and slide barrel over the screw
- Ensure sitting on the femur
- Use the plate impactor to snug DHS plate onto bone
- Use a 3.2mm drill bit and universal drill guide to drill the distal hole (ensure that sitting fully on bone)
- Measure screw hole and insert screw
- Ensure sitting on bone correctly
- Remove guidewire and lag screw attachments
- Drill, measure and insert remaning screws
- Take AP and lateral of the femoral neck and head, and AP and lateral views of the plate on the femur with the II machine and save them and upload them onto digital x-ray system
- Washout wound
- Ensure adequate haemostasis
- Closure (1 vicryl to muscle and fascia, 2/0 or 0 vicryl to subcutaneous fat, 3/0 monocryl to skin)
- Occlusive dressing over wound or skin glue
- Ensure safe transfer of patient off the traction table
- WHO sign out
- Operation note
Post op:
- Check Haemacue in recovery
- Monitor observations / urine output & neurovascular status of the limb
- Check HB, U&Es mane
- Mobilise Full Weight Bearing as pain allows
- VTE prophylaxis as per hospital policy
- Removal of sutures if necessary
- No routine follow up usually required
Practice
Use Touch Surgery to practice on their app
Video of operative technique
On a saw bone
On human